Posts

Turning on your PC from Google assistant from anywhere using your phone

Image
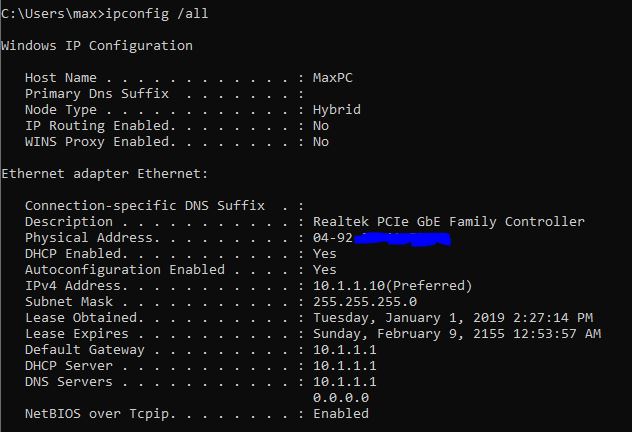
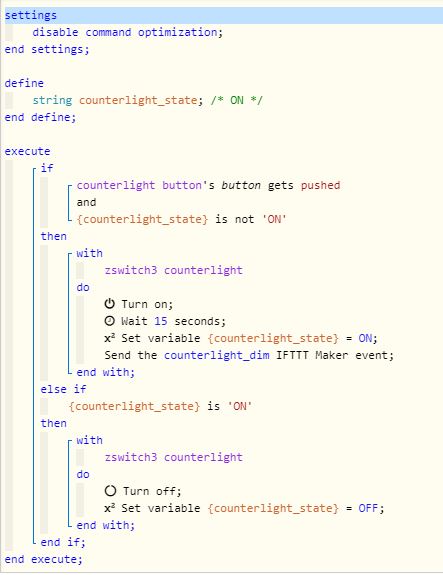
There were times where I have a need to remote control my home computer and run some file transfers jobs, but leaving it on 24x7 would equate to SGD11/mth for the power bill. It also does generate unnecessary heat as well. I thought it would be ideal to let it sleep most of the time and wake up as-and-when I need it. That prompted me on configuring a remote Wake-On-Lan (WOL) solution via the WebCORE app. (Refer to my previous post on WebCORE if you have not installed on your SMARTTHINGS) Do note that you will need to enable WOL on your motherboard BIOS prior to all these. Obtain your MAC address by typing "ipconfig /all" on the command prompt. Copy down the "Physical Address", also known as MAC address. Create a WebCORE piston something like below, Insert your MAC address on the part that is marked blue, do remove all the "-" and ":", we will need just the numbers and alphabets. When you come to the part on "IFTTT executes &#

Overcoming the limitations of ZWAVE switch status with WebCORE

Image
It just happened that one fine day on 18 Feb 2018, all of my CORE pistons are not firing in Smartthings(ST). I could not find out why and I thought the CORE codes are way outdated and I upgraded it to the Dec2017 version. Still it did not work. This is when I discover that the author of CORE, Ady264 have started development on WebCORE. Seems that this will replace CORE eventually. Eager to solve my problem, I installed WebCORE. There is a very comprehensive youtube video of doing it ->  https://youtu.be/y_ElUwmmI6Y Still, even a simple piston is not firing for WebCORE after the installation. I suspect it's something to do with ST and I waited one day. As expected, it worked on the following day and it is likely to be due to issues on the ST services at the backend. Anyway, I found WebCORE to be much more versatile and easier to program than CORE. It also provides the enabling of detail logging so that you know exactly why your pistons doesn't work. Previously in

Now, the light switches

Image
Now that I can control my TV,  AIRCON, CEILING FAN, YEELIGHTS , I want to control more/all things in my house using a combination of talking to Google home and the various sensors. That brings on the numerous number of light switches I have at home. I must have like 20 of these switches installed in all parts of my house. There is a complexity, all the popular switches sold in the US are designed based on US standards. They need a neutral wire on your switch to function properly. For most of us living in areas whereby your EU standard switches are just about opening and closing the circuit for the "Live" wire,  options are very limited. I came across this GR-HOME ZWAVE switch   when I am out looking for a solution. It costs USD35 each and comes in option of 1,2 or 3 ways in one switch module, doesnt sound too expensive as compared to the USD90 Fibaro switches that requires the neutral wire. Their switches comes in EU or US Zwave frequency, so depending on the version of

Adding Xiaomi sensors into SMARTTHINGS

Image
You will need all kinds of sensors and switches to fully automate your house to exactly how you want it to be. Sensors aint cheap. Then, there is this Xiaomi who saved the world of home automation with very reasonably priced sensors. These sensors don't work out-of-the-box with your Smartthings, but it is not difficult to get it working. Once you get the hang of it, it's a piece of cake. Motion Sensor - RMB59 Window/Door Sensor - RMB49 Wireless Switch - RMB39 Zigbee Power Plug - RMB69 You can order them through your favorite channels of buying from the China market. According to Xiaomi, the batteries in these devices(apart from Power Plug) can last for 2 years. In order to pair them with Smartthings, first, you will need to be as close to the Smartthings hub as possible with the sensor, your notebook and your phone. 1) On your notebook, login into your SMARTTHINGS IDE on a web browser -> https://graph-eu01-euwest1.api.smartthings.com/

SMARTTHINGS

Image
The SMART home poison have ate into me, this is probably the must have if you wish to turn your house into something SMART. Yes, I took the plunge and bought this SMARTTHINGS which comes with a few sensors. It comes in two different flavors, the US and EU. Be sure to buy the right version or else it will not support the Z-wave frequency of the region that you are in. It is unfortunate that I need the EU version and have to live with the expensive shipping from Amazon UK. Setting it up is easy, but there is an undocumented IDE website that you will need to visit in order to do the detail configuration of the SMARTTHINGS. https://graph.api.smartthings.com/ Of course, you will also need to download a phone APP for the convenience. You may add your own phone as a presence sensor as well. There are also other SMART home controllers, some cheaper,  but they are not as flexible and configurable as SMARTTHINGS. They is also a huge community supporting the SMARTTHINGS with their ow

Yeelight - a cheap and good alternative to Philip Hue

Image
The white bulb cost about SGD12 while the color ones cost about SGD20. All using the conventional E27 bulb socket, it can be controlled over using the WIFI. It works well with google home along with the free IFTTT services. There may have been frustration and feedback from many that controlling a group of bulbs doesnt work. I had that problem until I discover that the scene management is an effective workaround to that. 1) Download and install the Yeelight (not Mi home) app, login and set the locale to Singapore(important, anywhere but China). 2) Add your bulbs accordingly. 3) To set any scene, set the group of bulbs to the on/off state that you want, then go to scene management. For example, create a scene where all of your bulbs are in an off-state. Then create another one where they are in the on-state. 4) Choose the bulb that you want to apply the scene to. 5) Give the scene a name and you are done for the Yeelight App. 6) From IFTTT, create an applet with G

Logitech Harmony Hub

Image
Ok, the easiest step to get you started on home automation is to get a harmony hub. This will take care of controlling whatever you can control using infrared remote control This harmony hub cost me US$104 including Amazon shipping direct to Singapore. The remote controller is optional, which I dont need it at this point of time. The harmony hub comes with an additional IR blaster, which comes in handy if you need to control those equipment in the enclosed TV cabinet. Setting it up is very straight forward and I shall skip that technical part. This harmony hub powered by a USB socket from my WIFI router, works surprisingly well. Once done, the equipments can now be controlled via Google Home through the IFTTT. I spent a good 3 hours to get the following equipments working for the voice controlled. - Starhub TV box - Samsung TV - Xiaomi TV box - Haiku fan - Mitsubishi air-conditioner